
この記事を作った動機
libvirt の仕様を理解していなかった結果、大量の時間を溶かすことがあったので記録したい。具体的には、仮想マシンに対してRDPのためにポート転送を設定しようとしたが、libvirtが作成する、defaultネットワークに属している、virbr0ブリッジはnftablesをいじっても言うことを聞かないほど、ガチガチに守られていて使うべきではないという結論に至った。
今回はそこに至るまでの経緯と、実際に機能する事を確かめた対処方法について記録する。機能する対処方法の概要としては、libvirt以外に、手動でブリッジを専用に作成し、それに対してfirewalldでNATやDNATを構成し、仮想マシンにそのブリッジを使うように設定する事をする。
機能した対処方法
仮定
- 仮想マシンを動かしているホストマシンは、firewalldのpublicゾーンを使用している
- ホストマシンは、ブリッジに対して
192.168.150.1/24のIPを持つ - 仮想マシンのIPは手動で
192.168.150.25/24を割り当て、ゲートウェイにはホストマシンに向けて192.168.150.1と設定する sysctl -w net.ipv4.ip_forward=1が設定されており、カーネルが異なるインタフェース間のパケットの行き来を許可していること
ブリッジを作成
sudo brctl addbr virt
sudo ip link set virt up
sudo ip addr add 192.168.150.1/24 dev virt
仮想マシンを作成したブリッジを使うように設定
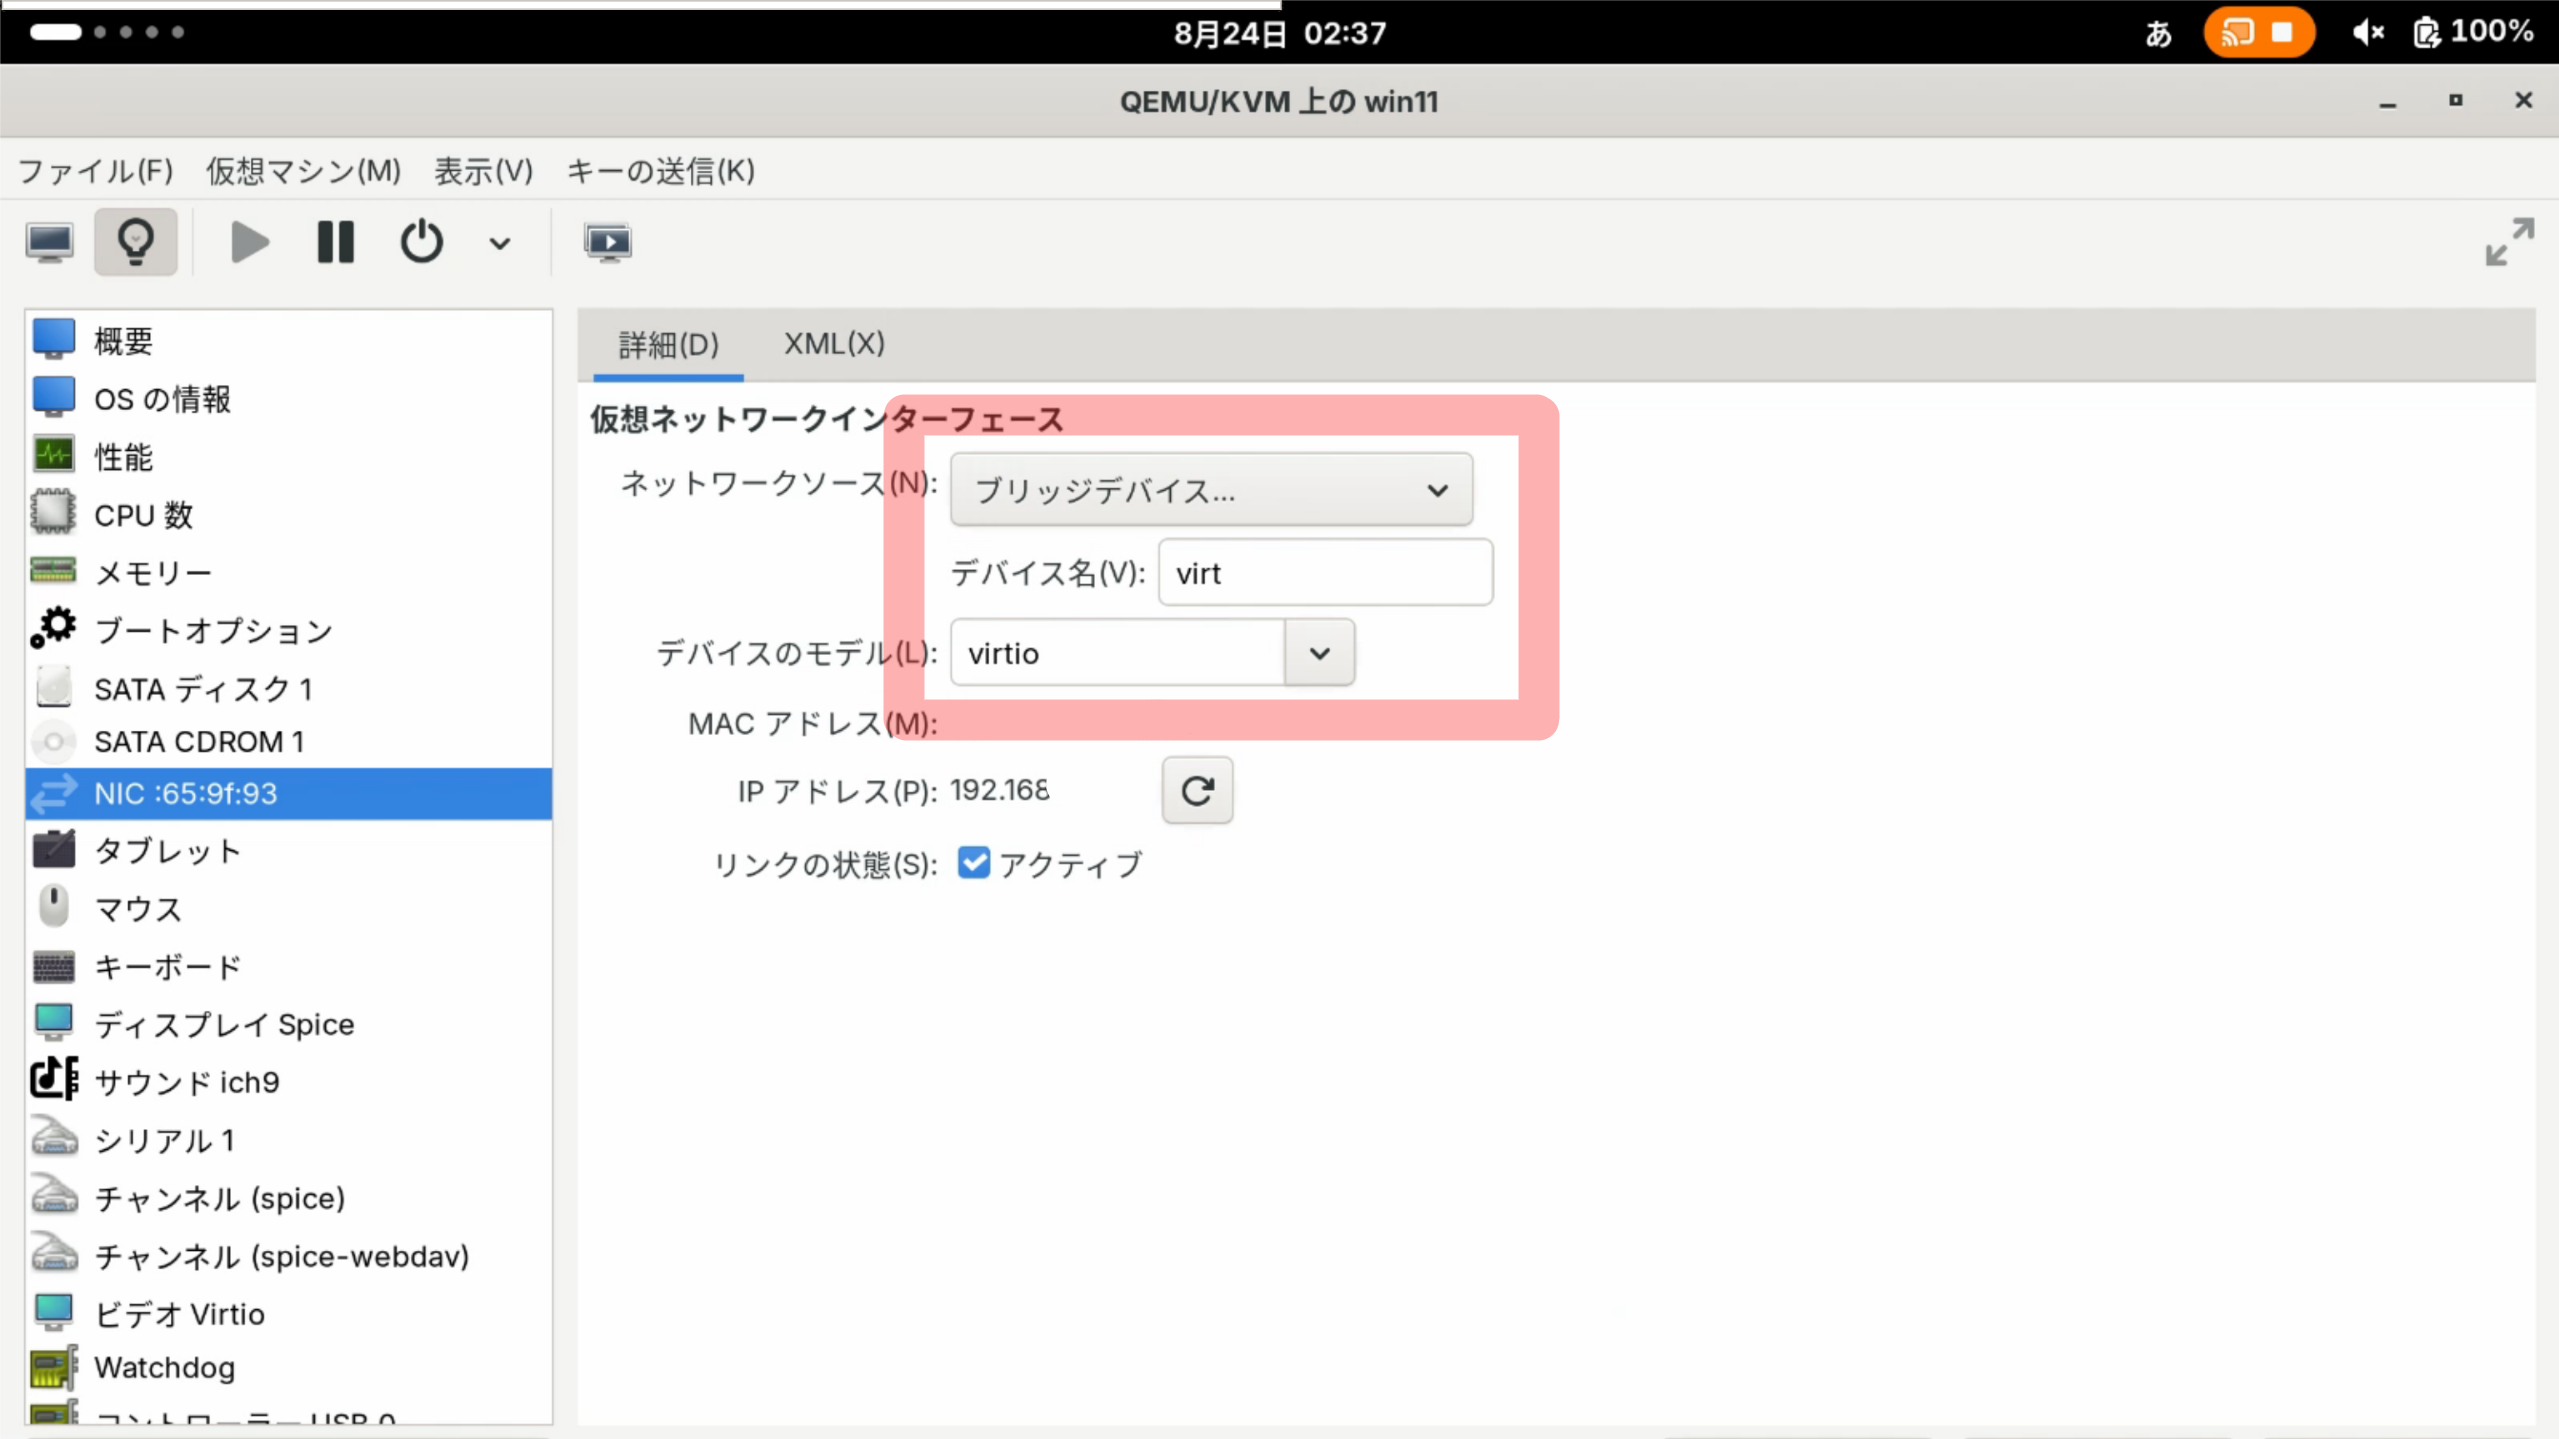
firewalld でNATとDNATを構成する
# ゾーンとポリシー(NAT用)を作成
sudo firewall-cmd --new-zone=virt --permanent
sudo firewall-cmd --zone=virt --add-interface=virt --permanent
sudo firewall-cmd --zone=virt --new-policy=nat --permanent
sudo firewall-cmd --policy=nat --add-ingress-zone=virt --permanent
sudo firewall-cmd --policy=nat --add-egress-zone=public --permanent
sudo firewall-cmd --policy=nat --add-masquerade --permanent

# ポート転送設定(DNAT)
sudo firewall-cmd --zone=public --add-forward-port=port=33890:proto=tcp:toport=3389:toaddr=192.168.150.25 --permanent
sudo firewall-cmd --zone=public --add-forward-port=port=33890:proto=udp:toport=3389:toaddr=192.168.150.25 --permanent

# NATが機能するようにマスカレードと転送を設定
sudo firewall-cmd --zone=public --add-masquerade --permanent
sudo firewall-cmd --zone=virt --add-forward --permanent
sudo systemctl restart firewalld
問題至るまでの経緯
今までの構成を見直す
今まで仮想マシンへのRDPアクセスは、無理やりVPN経路を通じて同じLAN内に仮想マシンを参加させることで動かしていた。接続が不安定であり定期的にVPNが接続できなくなったり、ネットワークトポロジ的にも循環経路を形成しかねないように見受けられた。VPNを介さずにホストマシンを直接介させることで、仮想マシンに対してRDPを行うために、今回は仮想マシンのRDPポートである、3389に対してポート転送を行う事を考えた。
ポート転送できず苦しむ
ポート転送するに際して、既に仮想マシンが、virbr0のブリッジに属していることに気づく。firewalldによって、ポート転送をそれに対して設定すれば、動くだろうと思い色々試行錯誤したもののどれもうまく行かず。最終的にnftablesで最優先に設定した設定をpreroutingやforwardチェーンに入れると、パケットはそのルールを反映するものの、意地でもvirbr0ではtcpdump -i virbr0 port 3389としてもパケットが一切見られなかった。あれこれして、ネットで色々当たった結果、以下のサイトの記述にとり、重要な事実としてlibvirtのデフォルトで作成されるブリッジについて重要な事実を知る。
- firewall-cmd - add-forward-port don’t work - Super User
https://superuser.com/questions/1474254/firewall-cmd-add-forward-port-dont-work (2026年8月24日)
The problem is in the KVM (libvirt) which when starting the "network" virbr0 injects rules (probably via firewalld) which prevents (first match principle) any attempt to port forwarding by conventional ways using firewall-cmd. The KVM injected (libvirt) rules are at the top of FORWARD and POSTROUTING, before regular firewalld ruleset. Since the netfilter operates on first match principle, these rules.
ブリッジを手動で作成する考えに至るまで
同じく以下の記事にして、以下の部分とlibvirtが生成したブリッジには触りたくないということとVirt-managerにあるネットワークの設定項目で任意のブリッジを手動で設定できる項目があることから、今回解決とした策に至った。
- firewall-cmd - add-forward-port don’t work - Super User
https://superuser.com/questions/1474254/firewall-cmd-add-forward-port-dont-work (2026年8月24日)
I have found another solution, which does not require any extra code. This was tested on Fedora 41; I am not sure about CentOS 7 which is rather old by this time.

All the commands in these instructions are to be run as root.

Edit the libvirt network (virsh net-edit default usually), find , change to . Then either just reboot your host or restart the network, usually like this:

virsh net-destroy default
virsh net-start default
At this point your guests have lost communication with the "outside world" because you have disabled libvirt's NAT, but now you add your own NAT.

First, take a look at your zones with firewall-cmd --get-active-zones. Here's what I got:

# firewall-cmd --get-active-zones
FedoraServer (default)
 interfaces: ens18
libvirt
 interfaces: virbr0
Your public zone can have a different name, adjust the rest of the commands accordingly (I think it's usually "public" in RHEL and derivatives). If you don't see virbr0 in the libvirt zone, add it: firewall-cmd --zone libvirt --add-interface virbr0. If virbr0 is in some other zone, use that zone name instead. But it should not be in your public zone.

Now we create the new NAT:

firewall-cmd --permanent --new-policy libvirt-nat
firewall-cmd --permanent --policy libvirt-nat --set-target ACCEPT
firewall-cmd --permanent --policy libvirt-nat --add-ingress-zone libvirt
firewall-cmd --permanent --policy libvirt-nat --add-egress-zone FedoraServer
firewall-cmd --permanent --policy libvirt-nat --add-masquerade
firewall-cmd --reload
Your guests should have their connectivity restored, and with this NAT your port forwarding is rather simple, for example:

firewall-cmd --permanent --zone FedoraServer --add-forward-port=port=8080:proto=tcp:toport=8080:toaddr=192.168.122.117
firewall-cmd --reload
Replace the port number and internal address as necessary.

There is a special case: when your guests have real IPv6 addresses and you have routing of these addresses configured through your host already . In this case you might want to allow the outside world to connect to your guests. If - and that is an if - you want to do so, add another policy:

firewall-cmd --permanent --new-policy libvirt-inbound
firewall-cmd --permanent --policy libvirt-inbound --set-target ACCEPT
firewall-cmd --permanent --policy libvirt-inbound --add-egress-zone libvirt
firewall-cmd --permanent --policy libvirt-inbound --add-ingress-zone FedoraServer
firewall-cmd --reload
Sometimes a cloud provider will give you IPv6 addresses but not route them. There is still a way to use them like this, it is something called "proxying NDP", but it is beyond the scope of this answer.
使った画像とか
- Red Hat, Inc., CC BY-SA 3.0 https://creativecommons.org/licenses/by-sa/3.0, via Wikimedia Commons
https://commons.wikimedia.org/wiki/File:Libvirt_logo.svg (2026年8月24日) - Home | firewalld
https://firewalld.org/ (2026年8月24日) - Microsoft Remote Desktop | Logopedia | Fandom
https://logos.fandom.com/wiki/Microsoft_Remote_Desktop (2026年8月24日)

参考にしたサイトとか
-
firewall-cmd - add-forward-port don’t work - Super User
https://superuser.com/questions/1474254/firewall-cmd-add-forward-port-dont-work (2026年8月24日) -
Configuring tables - nftables wiki
https://wiki.nftables.org/wiki-nftables/index.php/Configuring_tables (2026年8月24日) -
Bridging Network Interfaces in Linux | Baeldung on Linux
https://www.baeldung.com/linux/bridging-network-interfaces (2026年8月24日) -
nftables - how do you see dropped packets with nft command? : r/linuxquestions
https://www.reddit.com/r/linuxquestions/comments/1c01tju/nftables_how_do_you_see_dropped_packets_with_nft/ (2026年8月24日) -
TCPDump: Capture and Record Specific Protocols / Port Traffic - nixCraft
https://www.cyberciti.biz/faq/tcpdump-capture-record-protocols-port/ (2026年8月24日) -
Filter Port in Wireshark: Master Network Traffic (Guide) - NetSuite.blog
https://netsuite.blog/filter-port-wireshark (2026年8月24日) -
How to allow RDP in Windows 10 firewall: GUI & Powershell command
https://www.how2shout.com/how-to/windows-firewall-allow-rdp-using-gui-powershell-command.html (2026年8月24日) -
ローカルLLM (Gemma4-12b-qatやGemma4-31B) (2026年8月24日)