この記事を書いた動機
ここでは前回、hugoのショットコードを使えば、もっといい感じに画像を表示できるように調整できるのではということがあったので、それをやってみた過程を記録します。
hugo のセーフティーを外さないで、画像を自在に表示できるはずだと思っていたのと、shortcodes について調べているうちに、テーマ側に画像を表示するための、figure という shortcode を見つけたというのがある。
./theme/テーマ名/layouts/shortcodes/figure.html の存在に気づくことが、figure 発見のきっかけであった。
Features / Mods | PaperModでは、どうやって画像を表示するのか、私は見つけられなかった。(chrome で figure と検索をかけても出てこないので、ドキュメント見てどうしたら画像を表示できるか、すぐわかる感じじゃなさそう。)
ちなみに、かろうじて figure shortcode が、 FAQs / How To’s Guide | PaperMod にどうやったら画像を中心揃えにできるかという話題で載っていた。
この記事の目的
明らかによくないことを書き直す
前回のhugoで画像を追加する 📷では、hugo のセーフティを外すなど、よくない方法を紹介してしまっているので、それをできる範囲で改めようと試みる。多分今回の方法であれば、セーフティを外さなくてもうまくいくはずであるが、試す気力もないので検証はまだしていない。
放置記事を何とかする
そもそも、下の引用文にも書いてあるように、hugoで画像を追加する 📷の続きをすぐ書こうと当時思っていたのだが、結局やらずに何カ月も下書きのまま放置してたので、再び戻ってくることにした。
もっとよさそうな方法
hugo 内蔵の画像表示機能を使う。
- 追記(2025年1月26日)
Hugo 自体にはそんなものない。hugo の shortcodes というのを使って、自分で画像を表示するコードを書くか、テーマごとに用意された画像を表示するための shortcodes を使うことはできる。また、マークダウン形式でも画像を張り付けられるが、細かいスタイルの調整はできなかったと思う。
さらなる追記 (2025年1月30日)
今回、新たな間違いに気づいたので、ここにもその記録置いときます。。。なんでドキュメント見て気づけなかったんだろうとそんな気持ちです。。。(実は間違っていたと思っていることはあっていた。。。)
- 追記 (2025年1月30日)
今気づいたが、実は組み込みで、hugoに figure っていうのが入っていることに気づいた。hugo自体に画像を表示する機能がないというのは間違いで、気づけてないだけだった。
Figure | Hugo
shortcode で画像を表示する
選択肢
-
テーマ付属の shortcode を使う
-
自分で shortcode を適当に作る
-
hugo 内臓の figure shortcode を使う
(今回は検証とかしてないです。 追記: 2025年1月30日)
Figure | Hugo
テーマ付属の shortcode の例(PaperModの場合)
以下のようにして、記事のマークダウン中に figure という shortcode を呼び出す。
{{< figure src="/images/freedraw/test.png" title="ゆっくりれいむもどき (2024/12/31)" caption="with XPS 15 2-in-1 (9575), HP Active Style Pen (Gen3) and 釘で作ったペン先、、、" align="center" width="70%">}}

{{< figure
    src="staticフォルダからの画像の場所"
    title="タイトル"
    caption="説明文"
    align="center"
    width="70%" >}}
画像の配置は、hugo の作業ディレクトリからして、static という所に配置することができる。
...
./content/...
./static/ここの中のどこかに画像を置く
./hugo.yaml
...
テーマ付属の shortcode の実演例(PaperModの場合)
with XPS 15 2-in-1 (9575), HP Active Style Pen (Gen3) and 釘で作ったペン先、、、
自分で作る場合
hugo の作業ディレクトリからして layouts というフォルダの中の shortcodes というところに、"[shortcode名].html" という風にファイルを作成し、html を記述するようにして自由に表示したい内容をかく。
...
./content/...
./layouts/shortcodes/○○.html
./layouts/shortcodes/[shortcode名].html
./layouts/shortcodes/○○.html
./hugo.yaml
...
もし CSS や JavaScript 必要なら、画像を配置するのと同じ要領で、static フォルダのどこかにおいておく。イメージとしては以下のようになる。
...
./content/...
...
./static/JS/○○.js
./static/JS/imgViewer.js
./static/JS/○○.js
...
./static/CSS/○○.css
./static/CSS/imgShow.css
./static/CSS/○○.css
...
./hugo.yaml
...
ちなみにただ置いただけだと、CSS も JavaScript も読み込まれないので、テーマ側を少しいじる必要がある。私は、“baseof.html” という、hugoでいろんなページを生成するときの基本になるテーマ側の html テンプレート再定義することで読み込ませている。
すでにテーマを導入している場合も、./layouts フォルダ内に、./themes/テーマ名/layouts の再定義したい部分だけコピーして改変すれば、テーマ更新時以外はとりあえず動くと思われる。
./layouts/_default/baseof.html
{{- if lt hugo.Version "0.112.4" }}
{{- errorf "=> hugo v0.112.4 or greater is required for hugo-PaperMod to build " }}
{{- end -}}

<!DOCTYPE html>
<html lang="{{ site.Language }}" dir="{{ .Language.LanguageDirection | default "auto" }}">
    <head>
        {{- partial "head.html" . }}
        {{- partial "customHead.html" . }}
    </head>

    <body ...>
        ...
        {{ partial "imgViewer.html" .}}
        {{/*  {{ partial "chatScript.html" . }}  */}}
    </body>
</html>
./layouts/partials/customHead.html
<link rel="stylesheet" href="{{ "css/annotate.css" | relURL }}">
<link rel="stylesheet" href="{{ "css/hideLongThings.css" | relURL }}">
<link rel="stylesheet" href="{{ "css/common.css" | relURL }}">
<link rel="stylesheet" href="{{ "css/chat.css" | relURL }}">

<script src="{{ "js/hideLongThings.js" | relURL }}"></script>
自分で作る場合の shortcode の例
以下は私の書いている shortcode の例である。相変わらず動くことやとにかく完成させることを最優先でやってるので、あまり参考にはならないと思うが、雰囲気だけでもつかめたらいいと思う。
./layouts/shortcodes/imgShow.html
{{ $width := .Get "width" | default "100%" }}
{{ $showTitle := .Get "showTitle" | default "false" }}
<div style="display:flex; justify-content:center; margin:10px; flex-direction: row;">
    {{/*  {{ $style := printf "width: %s;" (cast.ToString $width) }}  */}}
    {{ $style := printf "width: %s;" (cast.ToString $width) | safeCSS }}

    <div style="{{ $style }}">
        <img style="margin:10px;" src={{ .Get "src" }} alt={{ .Get "alt" }}/>
        {{ if eq $showTitle "true" }}
            <p style="text-align: center;">{{ .Get "alt" }}</p>
        {{ end }}
    </div>
</div>
./layouts/shortcodes/align.html
{{ $alignDirection := .Get "align" | default }}
{{ $align := print "flex-direction: %s;" $alignDirection | safeCSS }}
{{ $style := print "display:flex; %s" $align | safeCSS }}

<div class="alignContaier" style={{ $style }}>
    {{ .Inner }}
</div>
ちなみに、上記の例の shortcode を使うには以下のようにする。
{{< align >}}
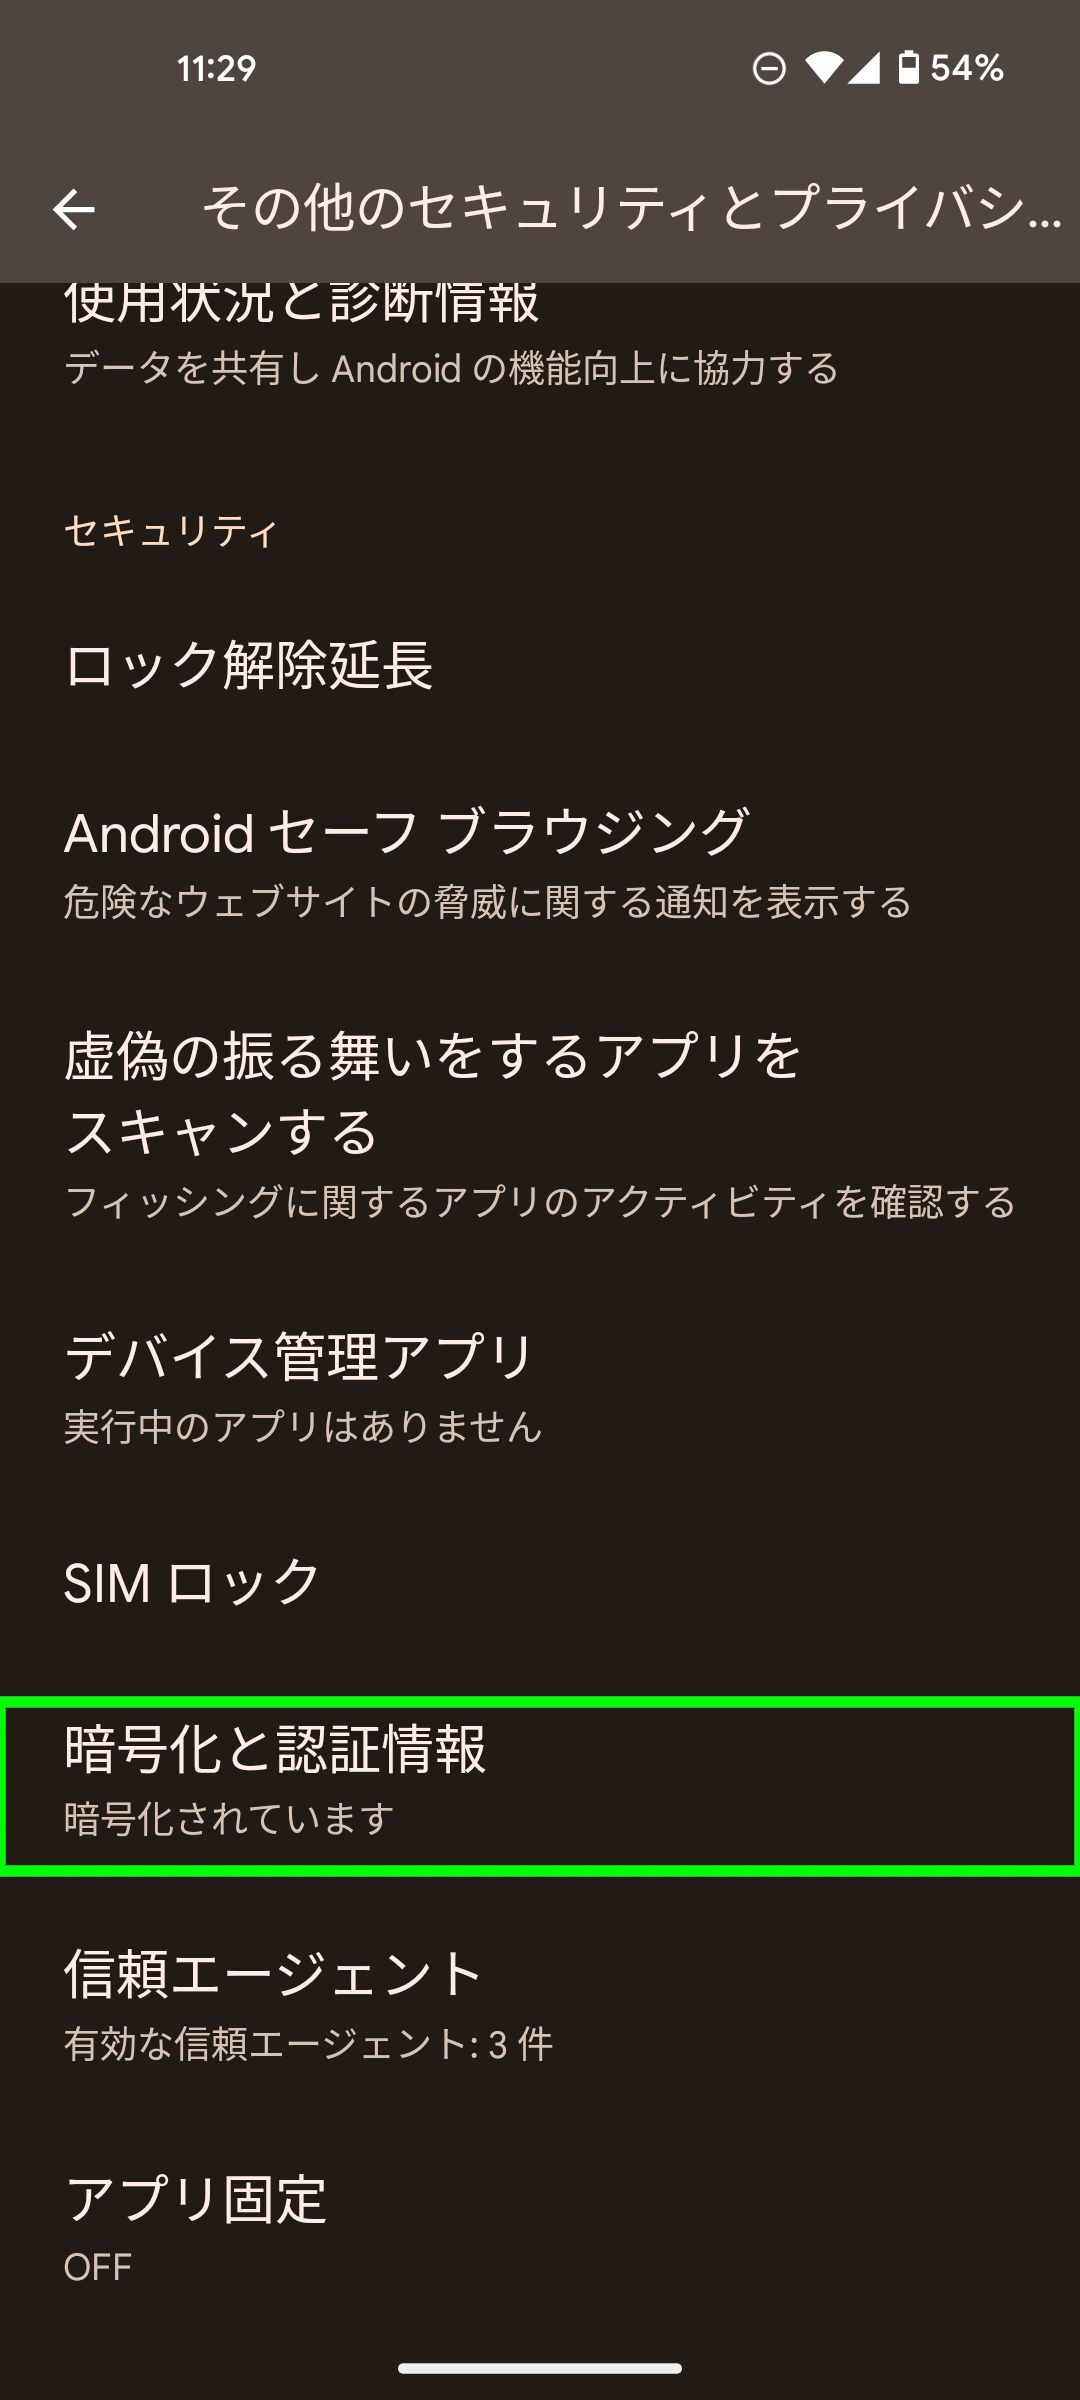
{{< imgShow src="/posts/android/firefox/personalCA/caInstall/securitySettings0.png" alt="CA認証局の証明書インストール" >}}
{{< imgShow src="/posts/android/firefox/personalCA/caInstall/securitySettings.png" alt="CA認証局の証明書インストール1" >}}
{{< imgShow src="/posts/android/firefox/personalCA/caInstall/securitySettings1.png" alt="CA認証局の証明書インストール2" >}}
{{< /align >}}
自分で作る場合の実演例
参考にしたサイト
- FAQs / How To’s Guide | PaperMod
https://adityatelange.github.io/hugo-PaperMod/posts/papermod/papermod-faq/#centering-image-in-markdown (2025年1月26日) - Create your own shortcodes | Hugo
https://gohugo.io/templates/shortcode/ (2025年1月26日) - Shortcodes | Hugo
https://gohugo.io/content-management/shortcodes/ (2025年1月26日) - Features / Mods | PaperMod
https://adityatelange.github.io/hugo-PaperMod/posts/papermod/papermod-features/ (2025年1月26日)